The view from the docks at the town of Abisko on Lake Trondetraske. The “Gates of Lapland” is seen in the distance as a notch in the wall of mountains.
Green light from ionized oxygen dominates, but is accompanied by reds from ionized nitrogen. They follow complex fields that creates sheets and apparent loops of light.
During this 8-second exposure, a train enters the view, its headlight illuminating the landscape. The train adds its own trails of light, including the arcs of its electrical contact with the overhead wire.
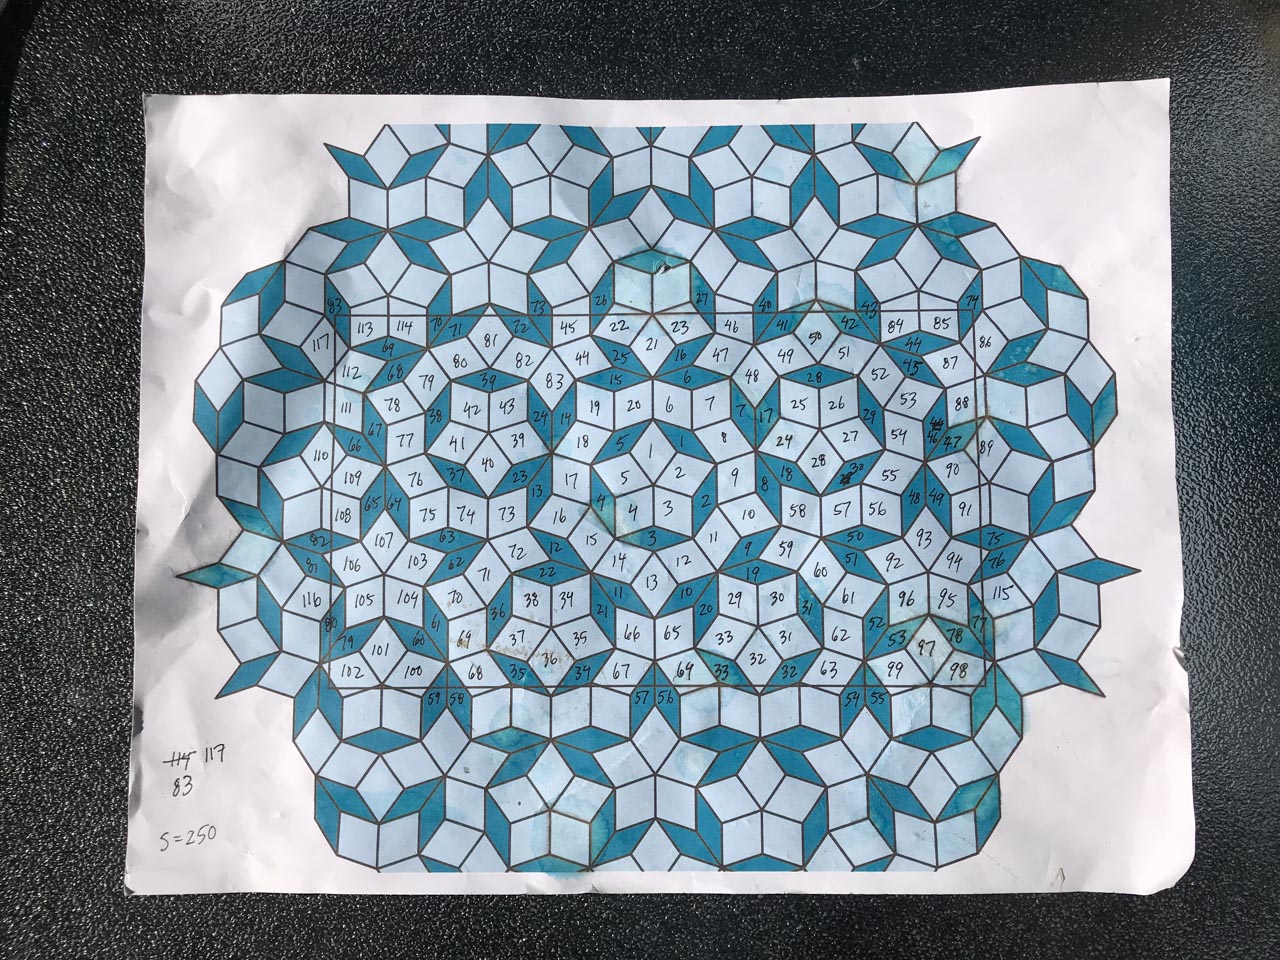
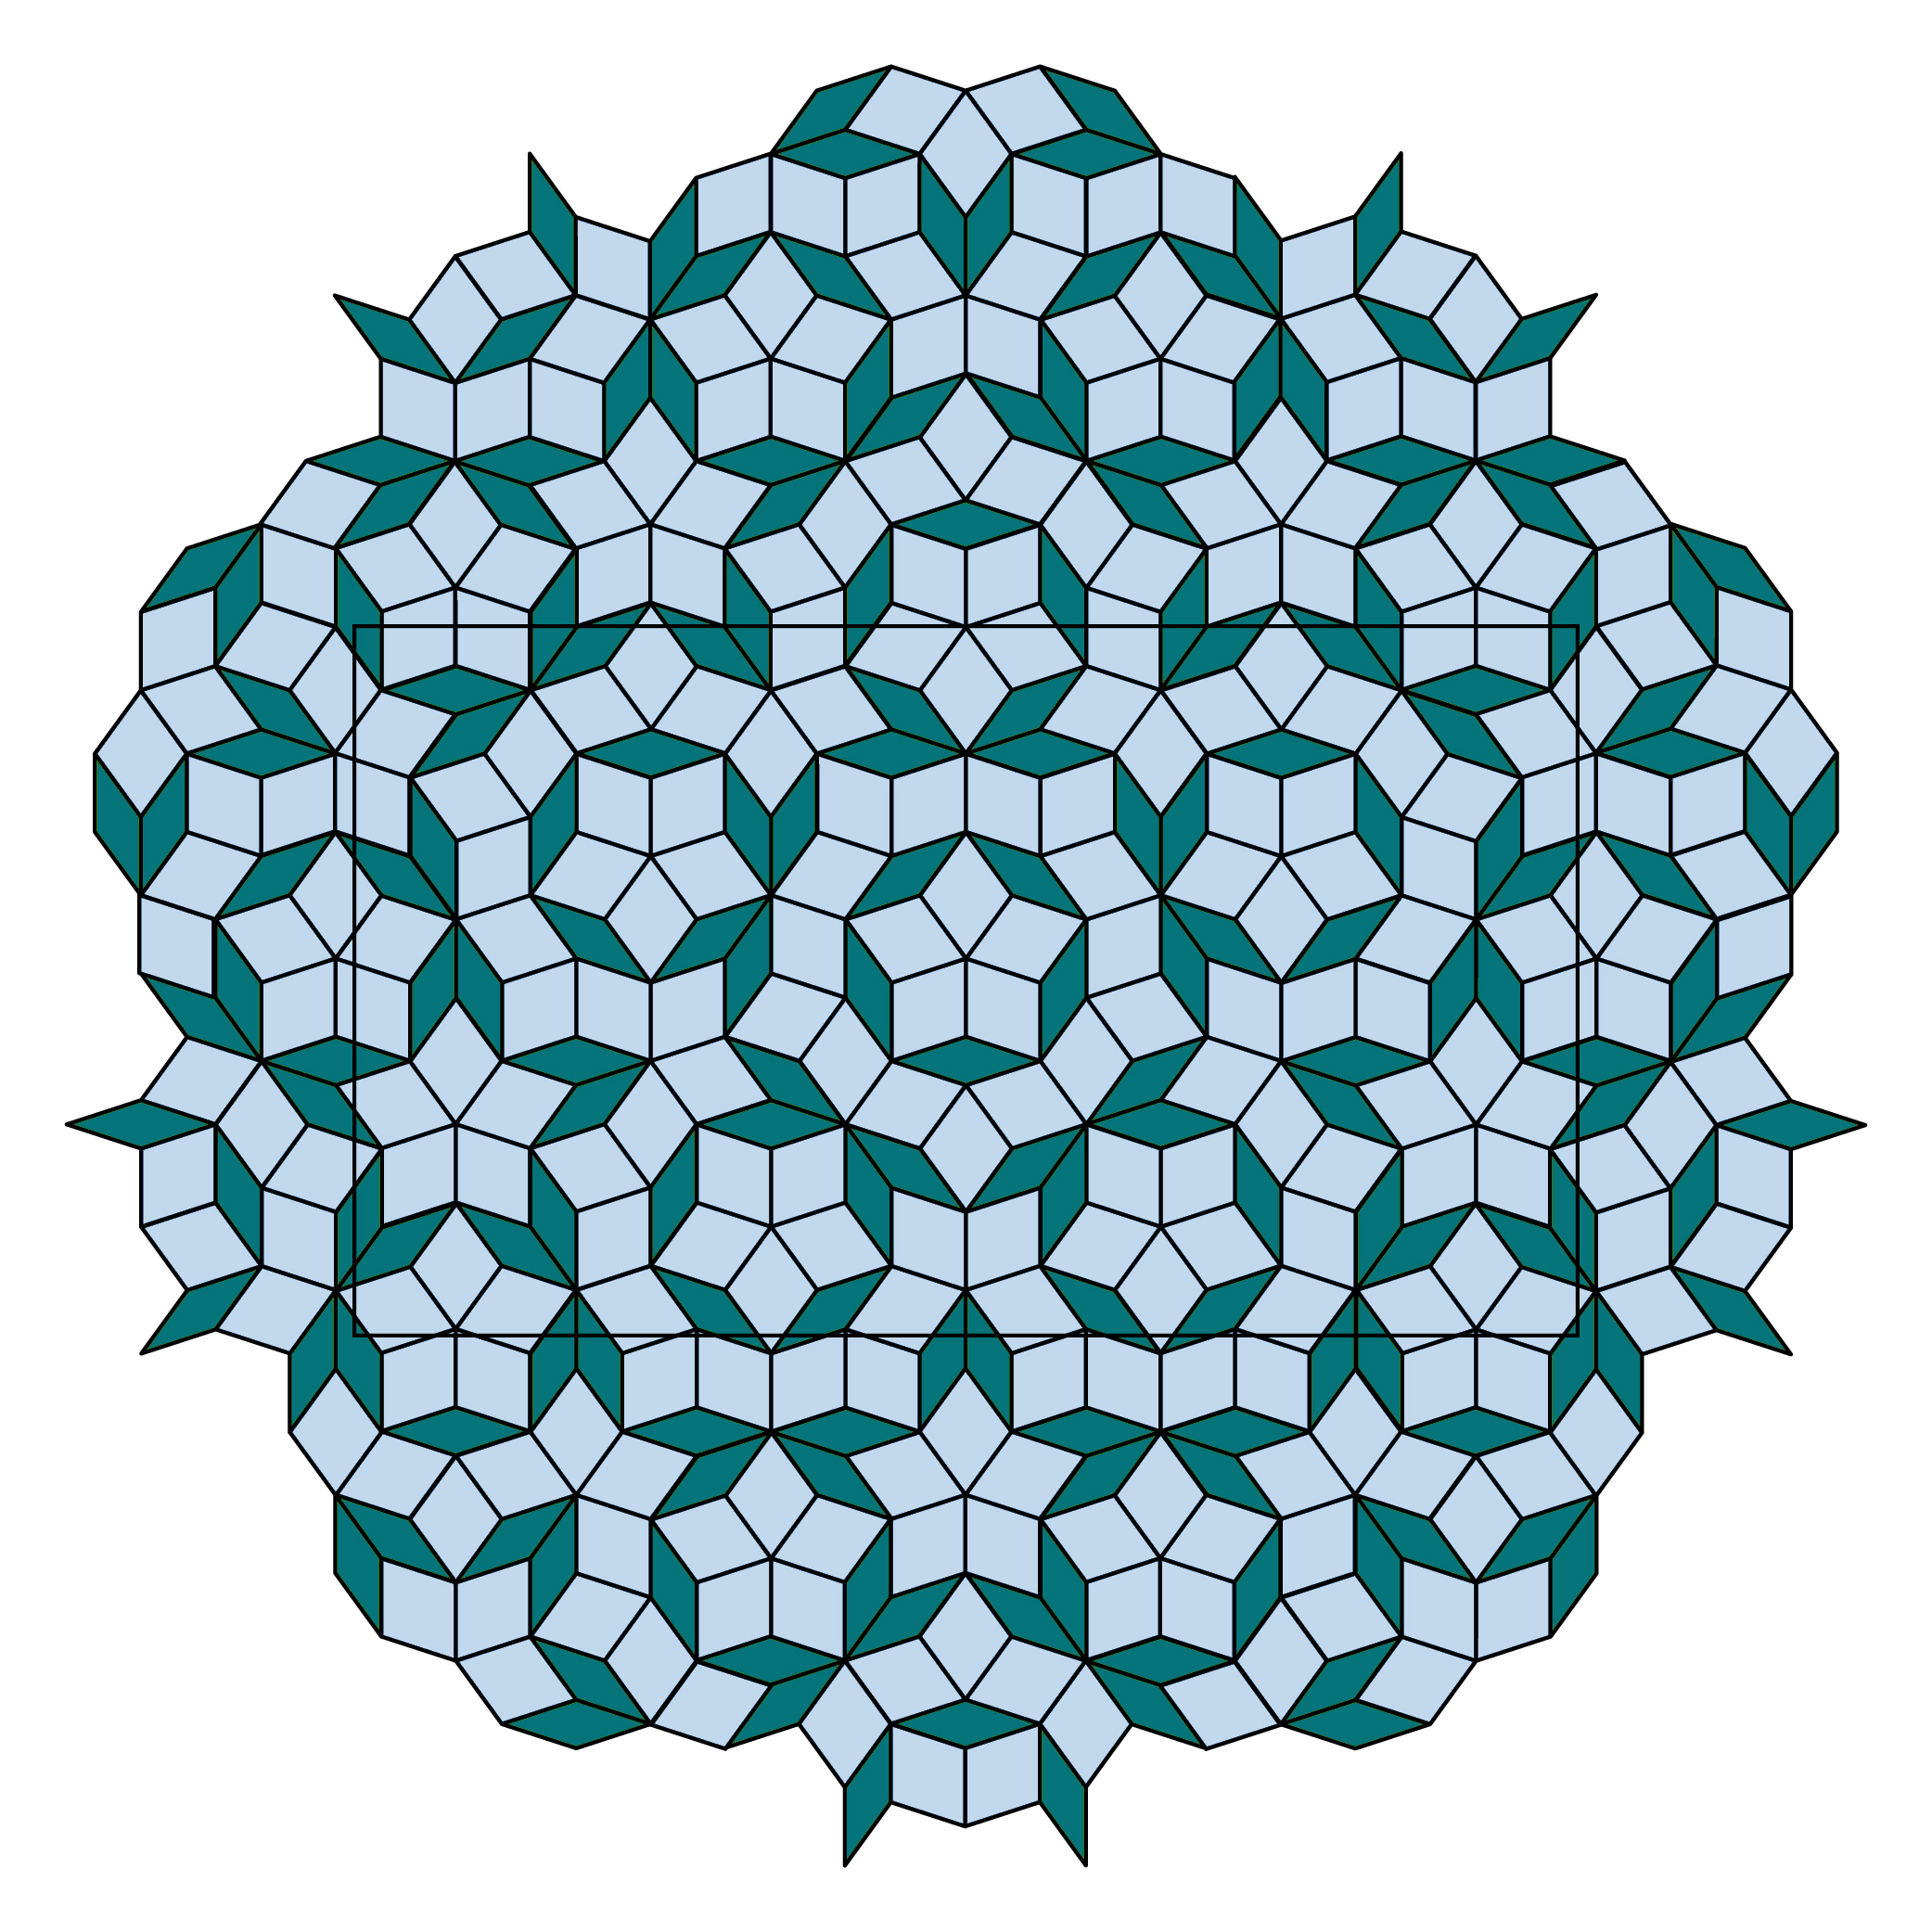
My printed tile map. It identifies the fat and skinny rhombus tiles so that I knew how many to make and how to place them. It was generated based on a simulation of an edge length of 250mm and a gap width of 6mm, adding up to a nice binary number.
I suspended this project in order to go on a roadtrip to capture pictures of the night sky in the beautiful deserts of the Southwest. I am currently working on them, and hope to share them soon, but the Penrose tile floor project carries a higher priority—we want our screen porch back while it is still summer!
Having prepared my tiles to the best accuracy I could coax from my woodworking tools, I now faced how to place them on the floor. As before, I considered the advice from Ken Adelman, who recommended “dis-aligning” the pattern from the rectangle of the room, to avoid difficult or awkward-looking tile fragments at the edges. He also recommended identifying a center point and creating reference lines radiating at angles that match the pentagonal symmetries of the tiling.
A timelapse of a Penrose tile installation by Ken Adelman
I am about to embark on a month-long road trip, and I am reluctant to start the next phase of this project—laying and setting the tiles, something I expect will take a considerable amount of time and attention. Instead, I need to make plans for this upcoming trip which involve excursions to remote areas of the Southwest for the purpose of making night timelapse sequences. I am skeptical that I can fully succeed at either, much less both, in the time remaining.
So for now, I will put my tiles aside, and will instead present a rendition of the tile-laying process made by my Facebook friend Ken Adelman, the person I referred to as having succeeded in Penrose-tiling his sunroom, and who has kindly counseled me in this project.
He made a timelapse of his installation that spanned several days. I have posted it to my Vimeo account and you can watch it here. I found the movement of the sun quite fascinating as the tiles were carefully placed and spaced, the shadows indicating the elapsed time involved.
Maybe I can make a similar movie, but it will have to wait until after I return from the Nightscaper Conference, where I hope to learn the modern tools of nighttime landscape photography. Technology has changed dramatically from when I embarked on my Nightscape Odyssey twenty years ago, and I am eager to keep up.
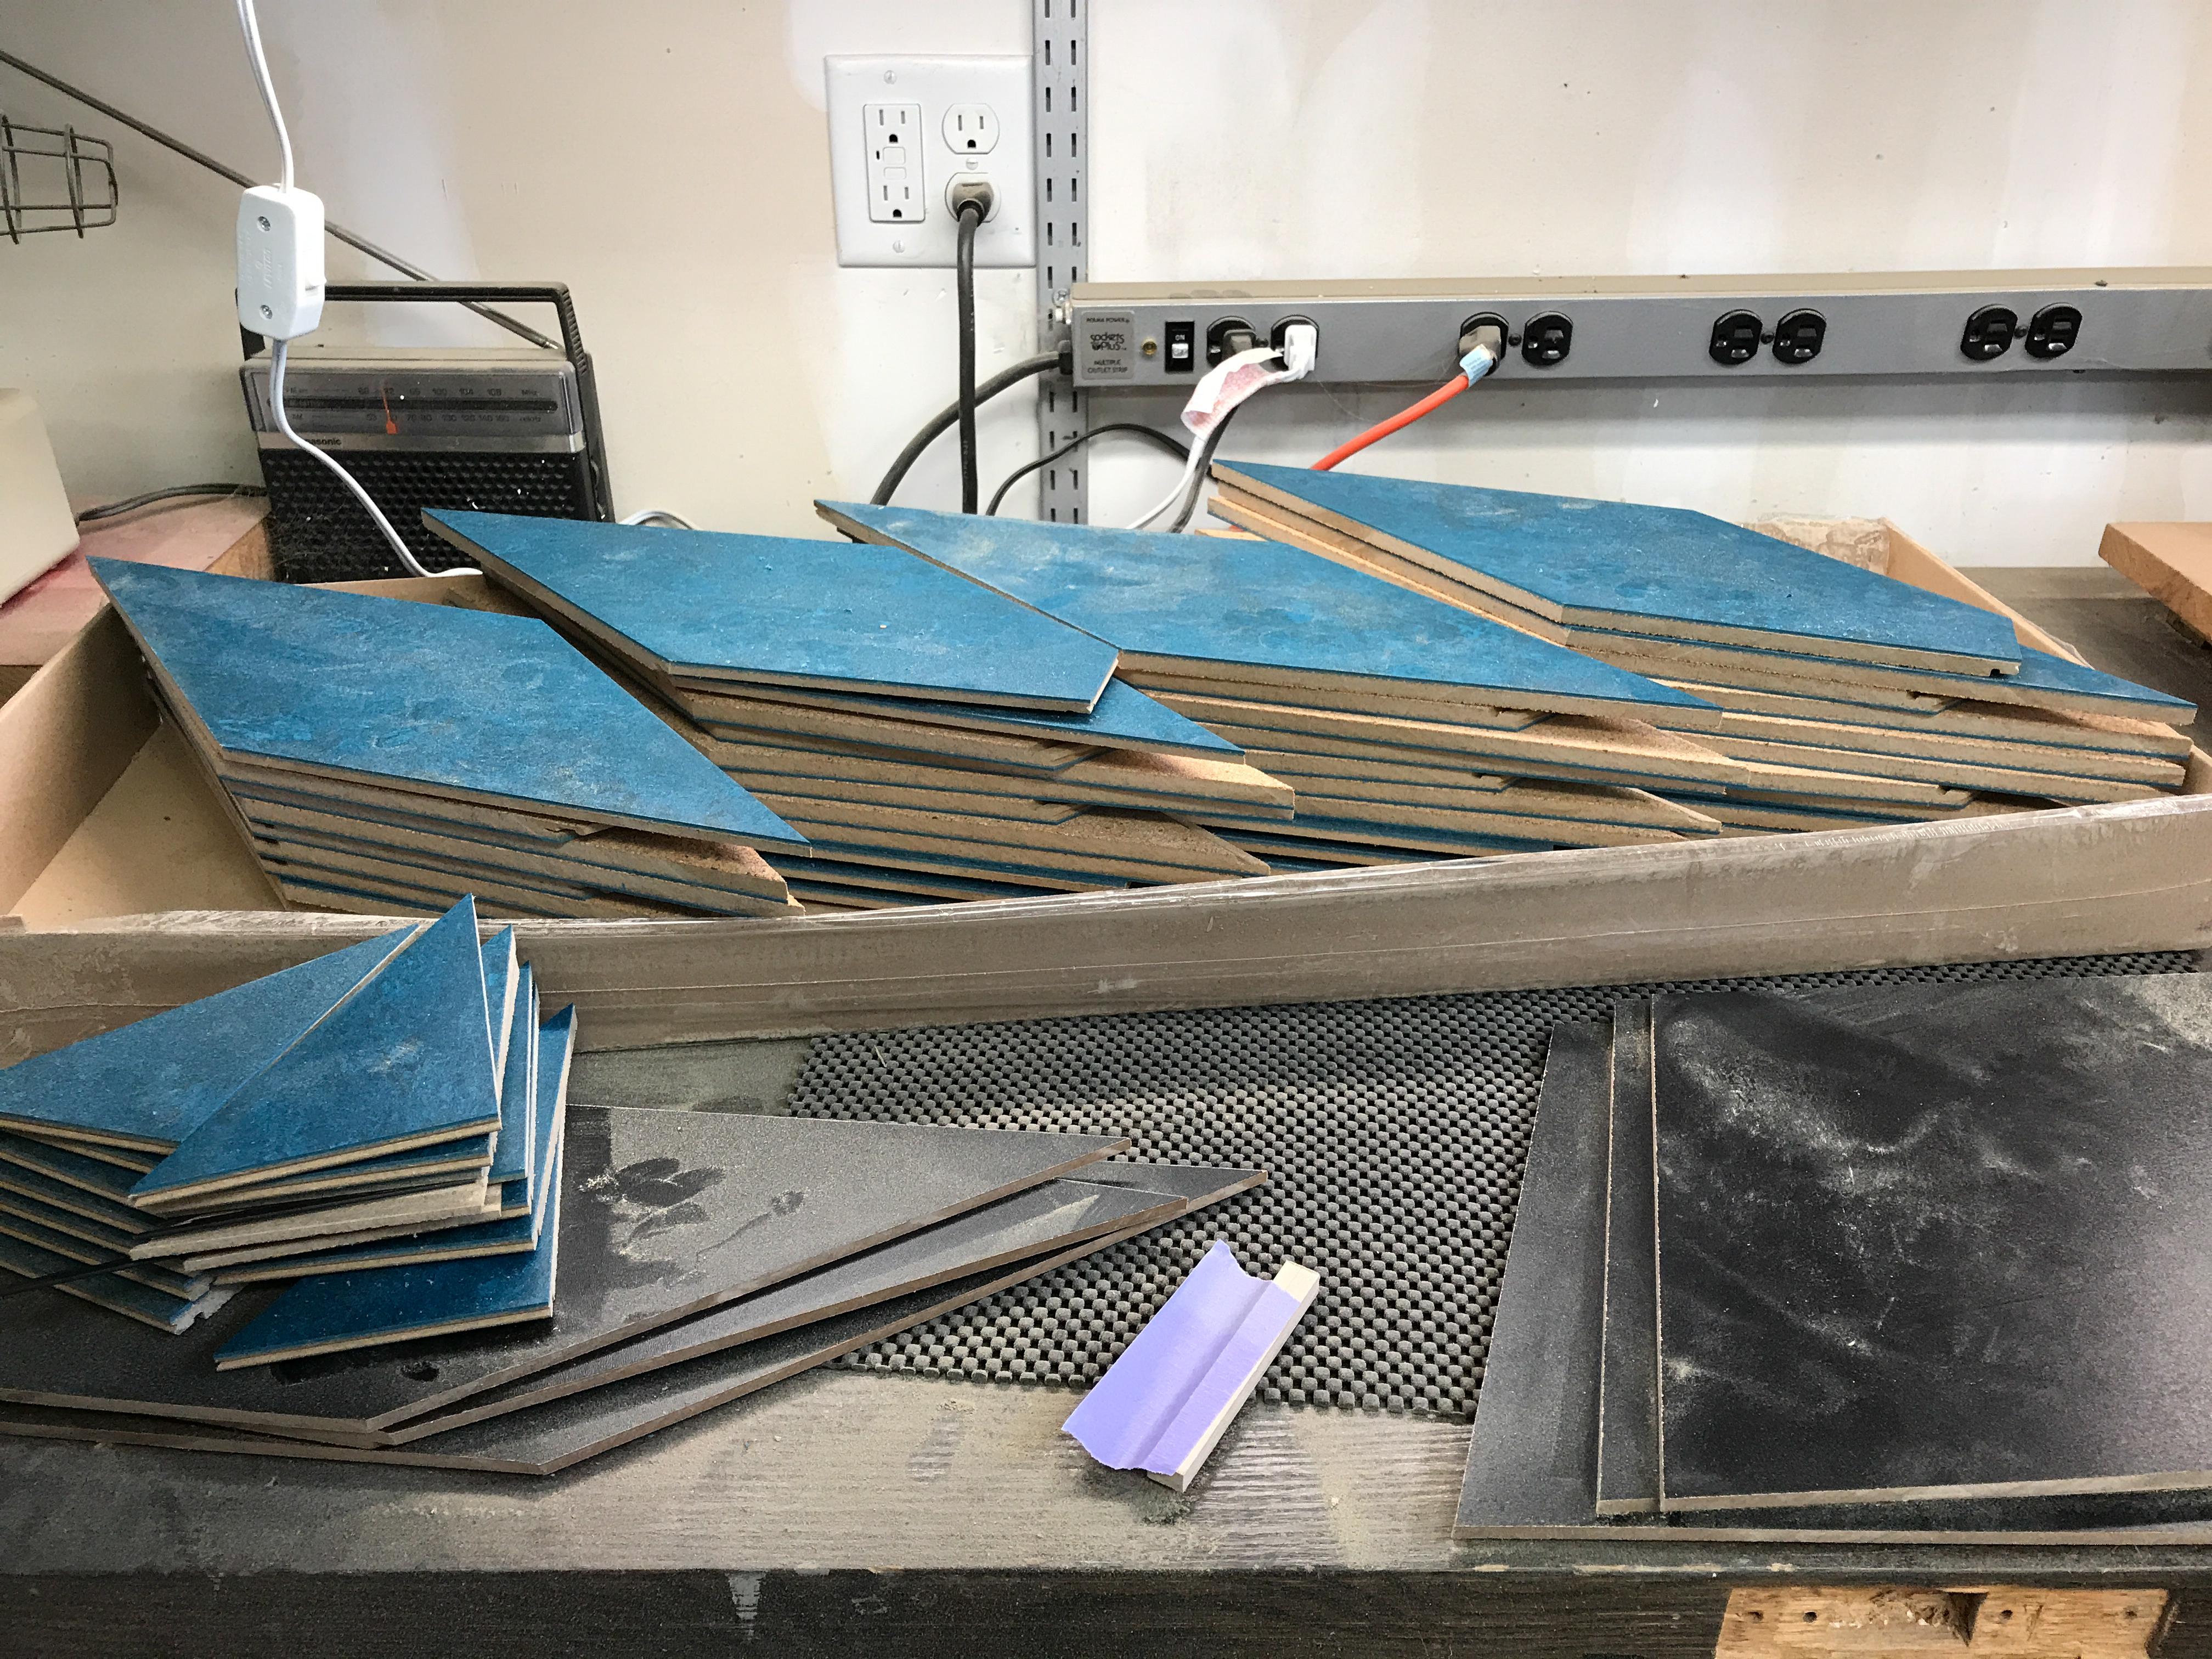
My hand-crafted P3 rhombuses, awaiting my return to install them.
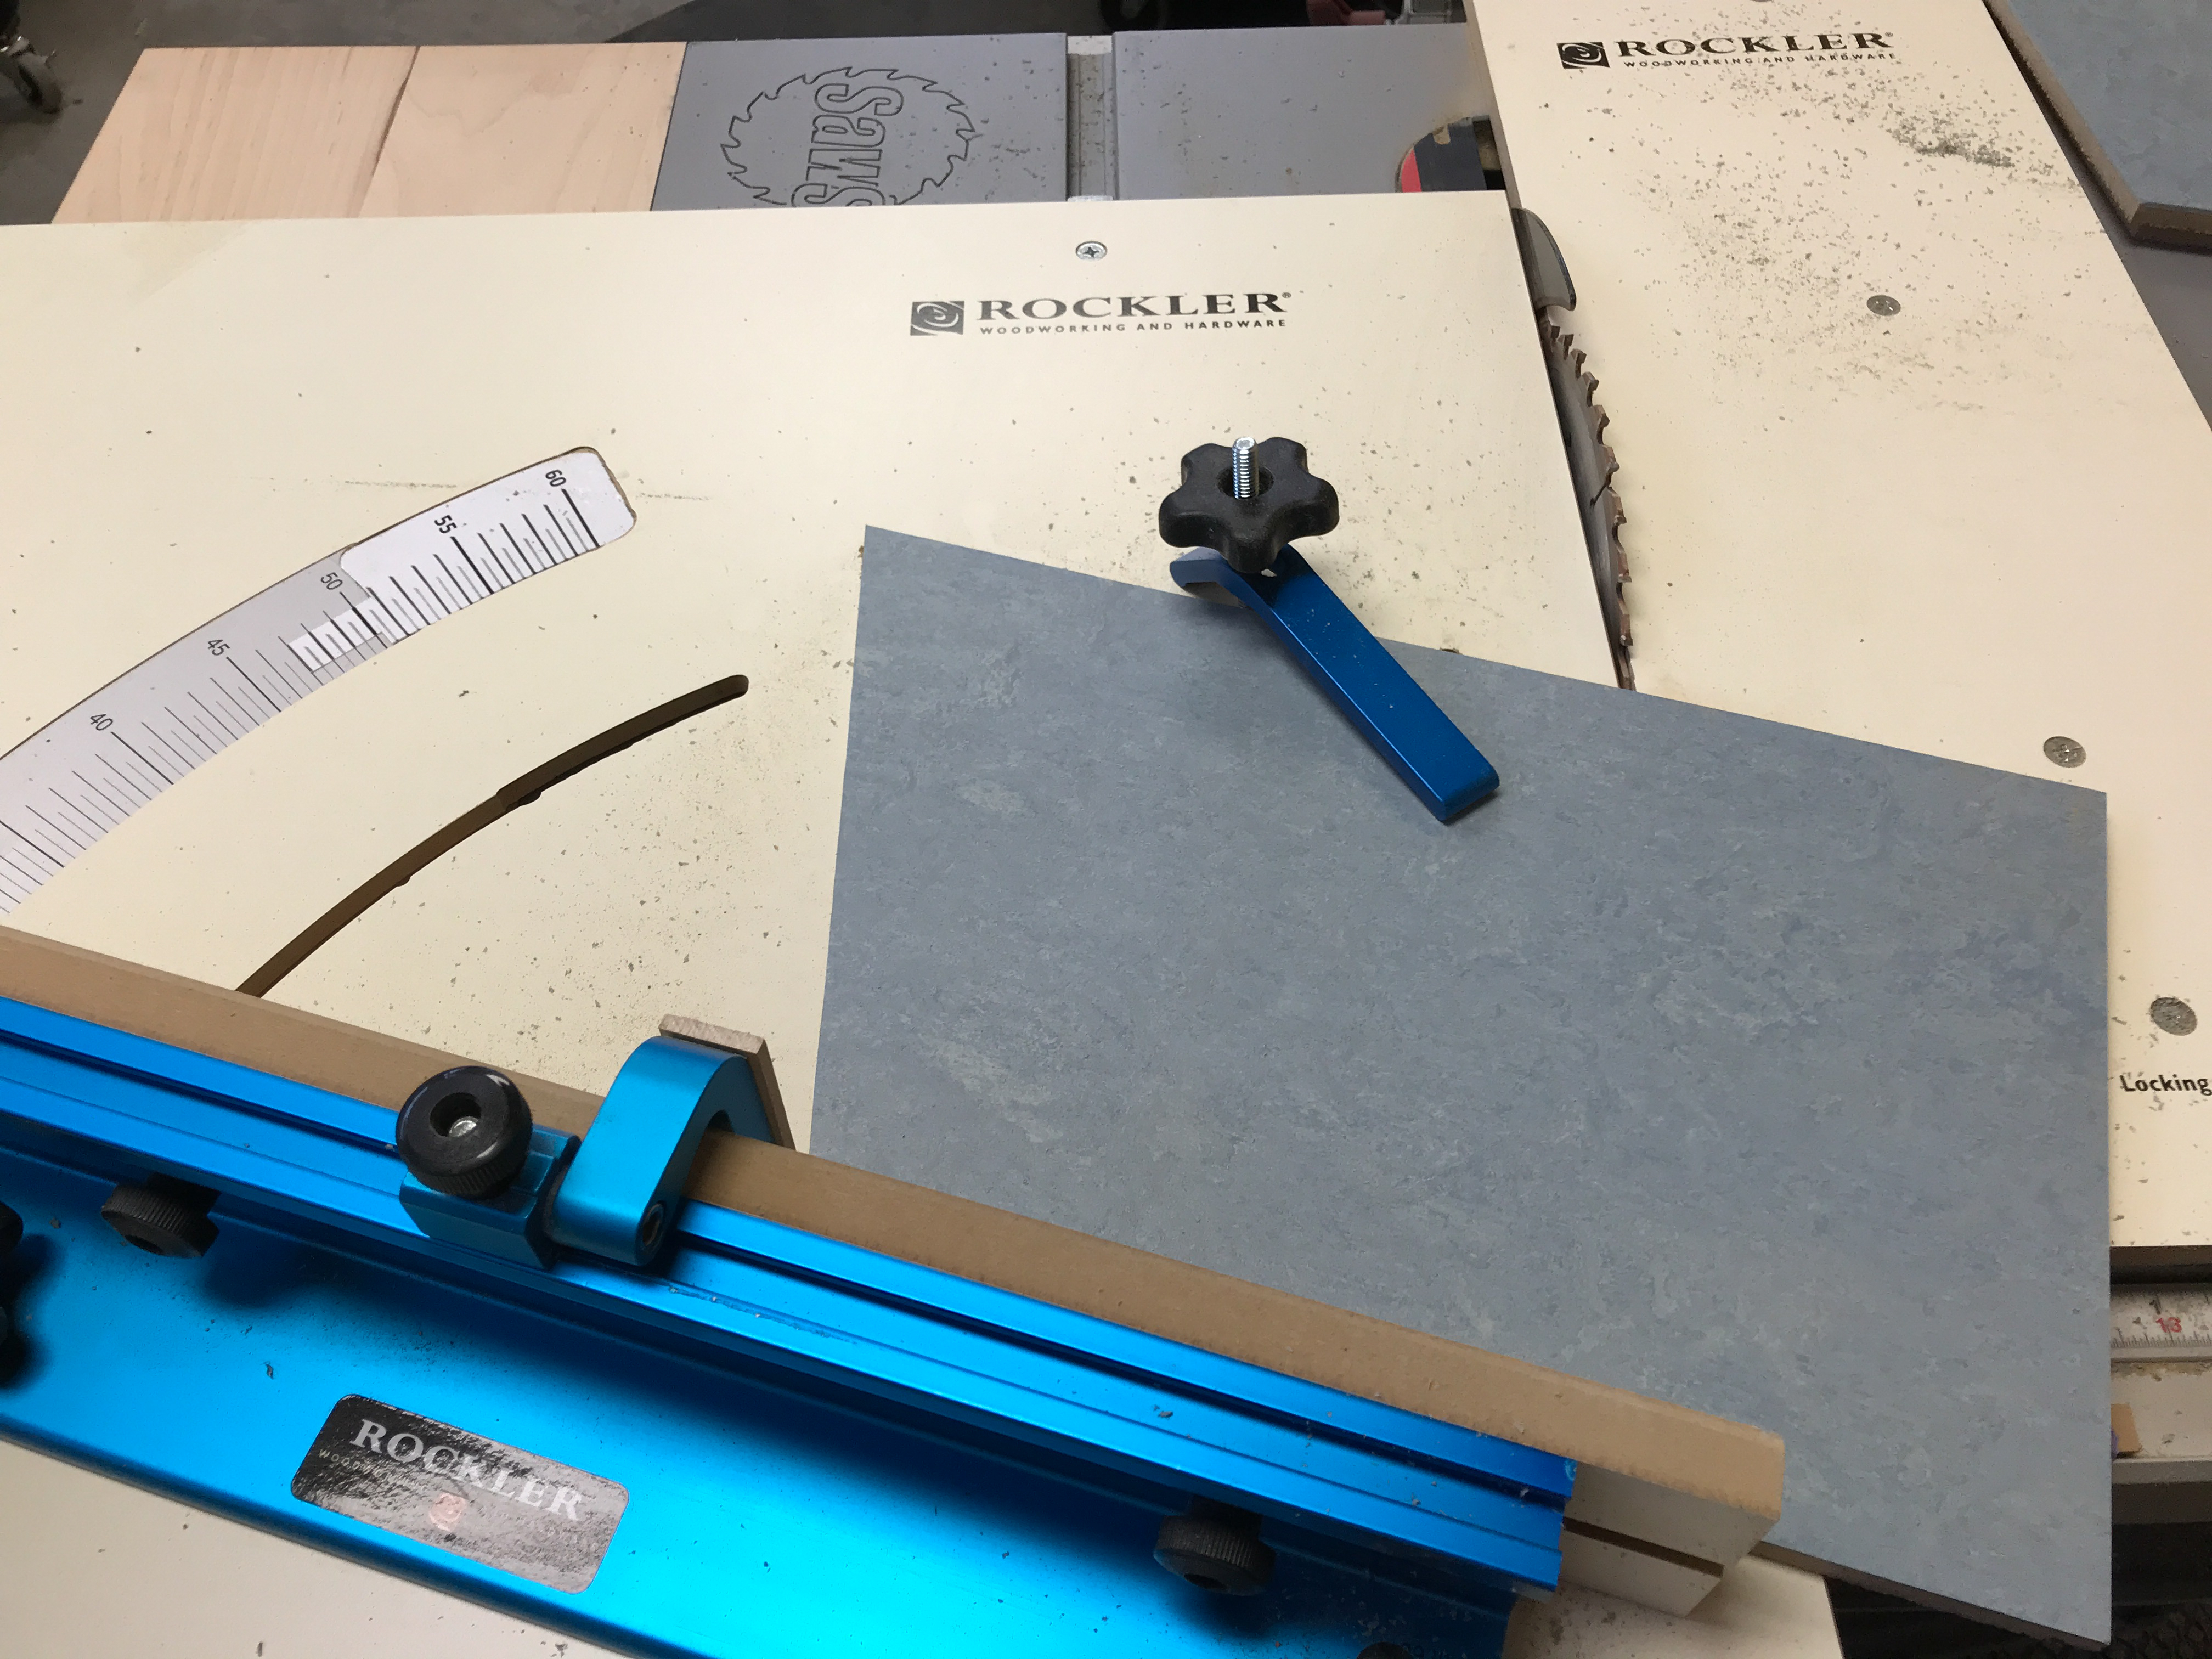
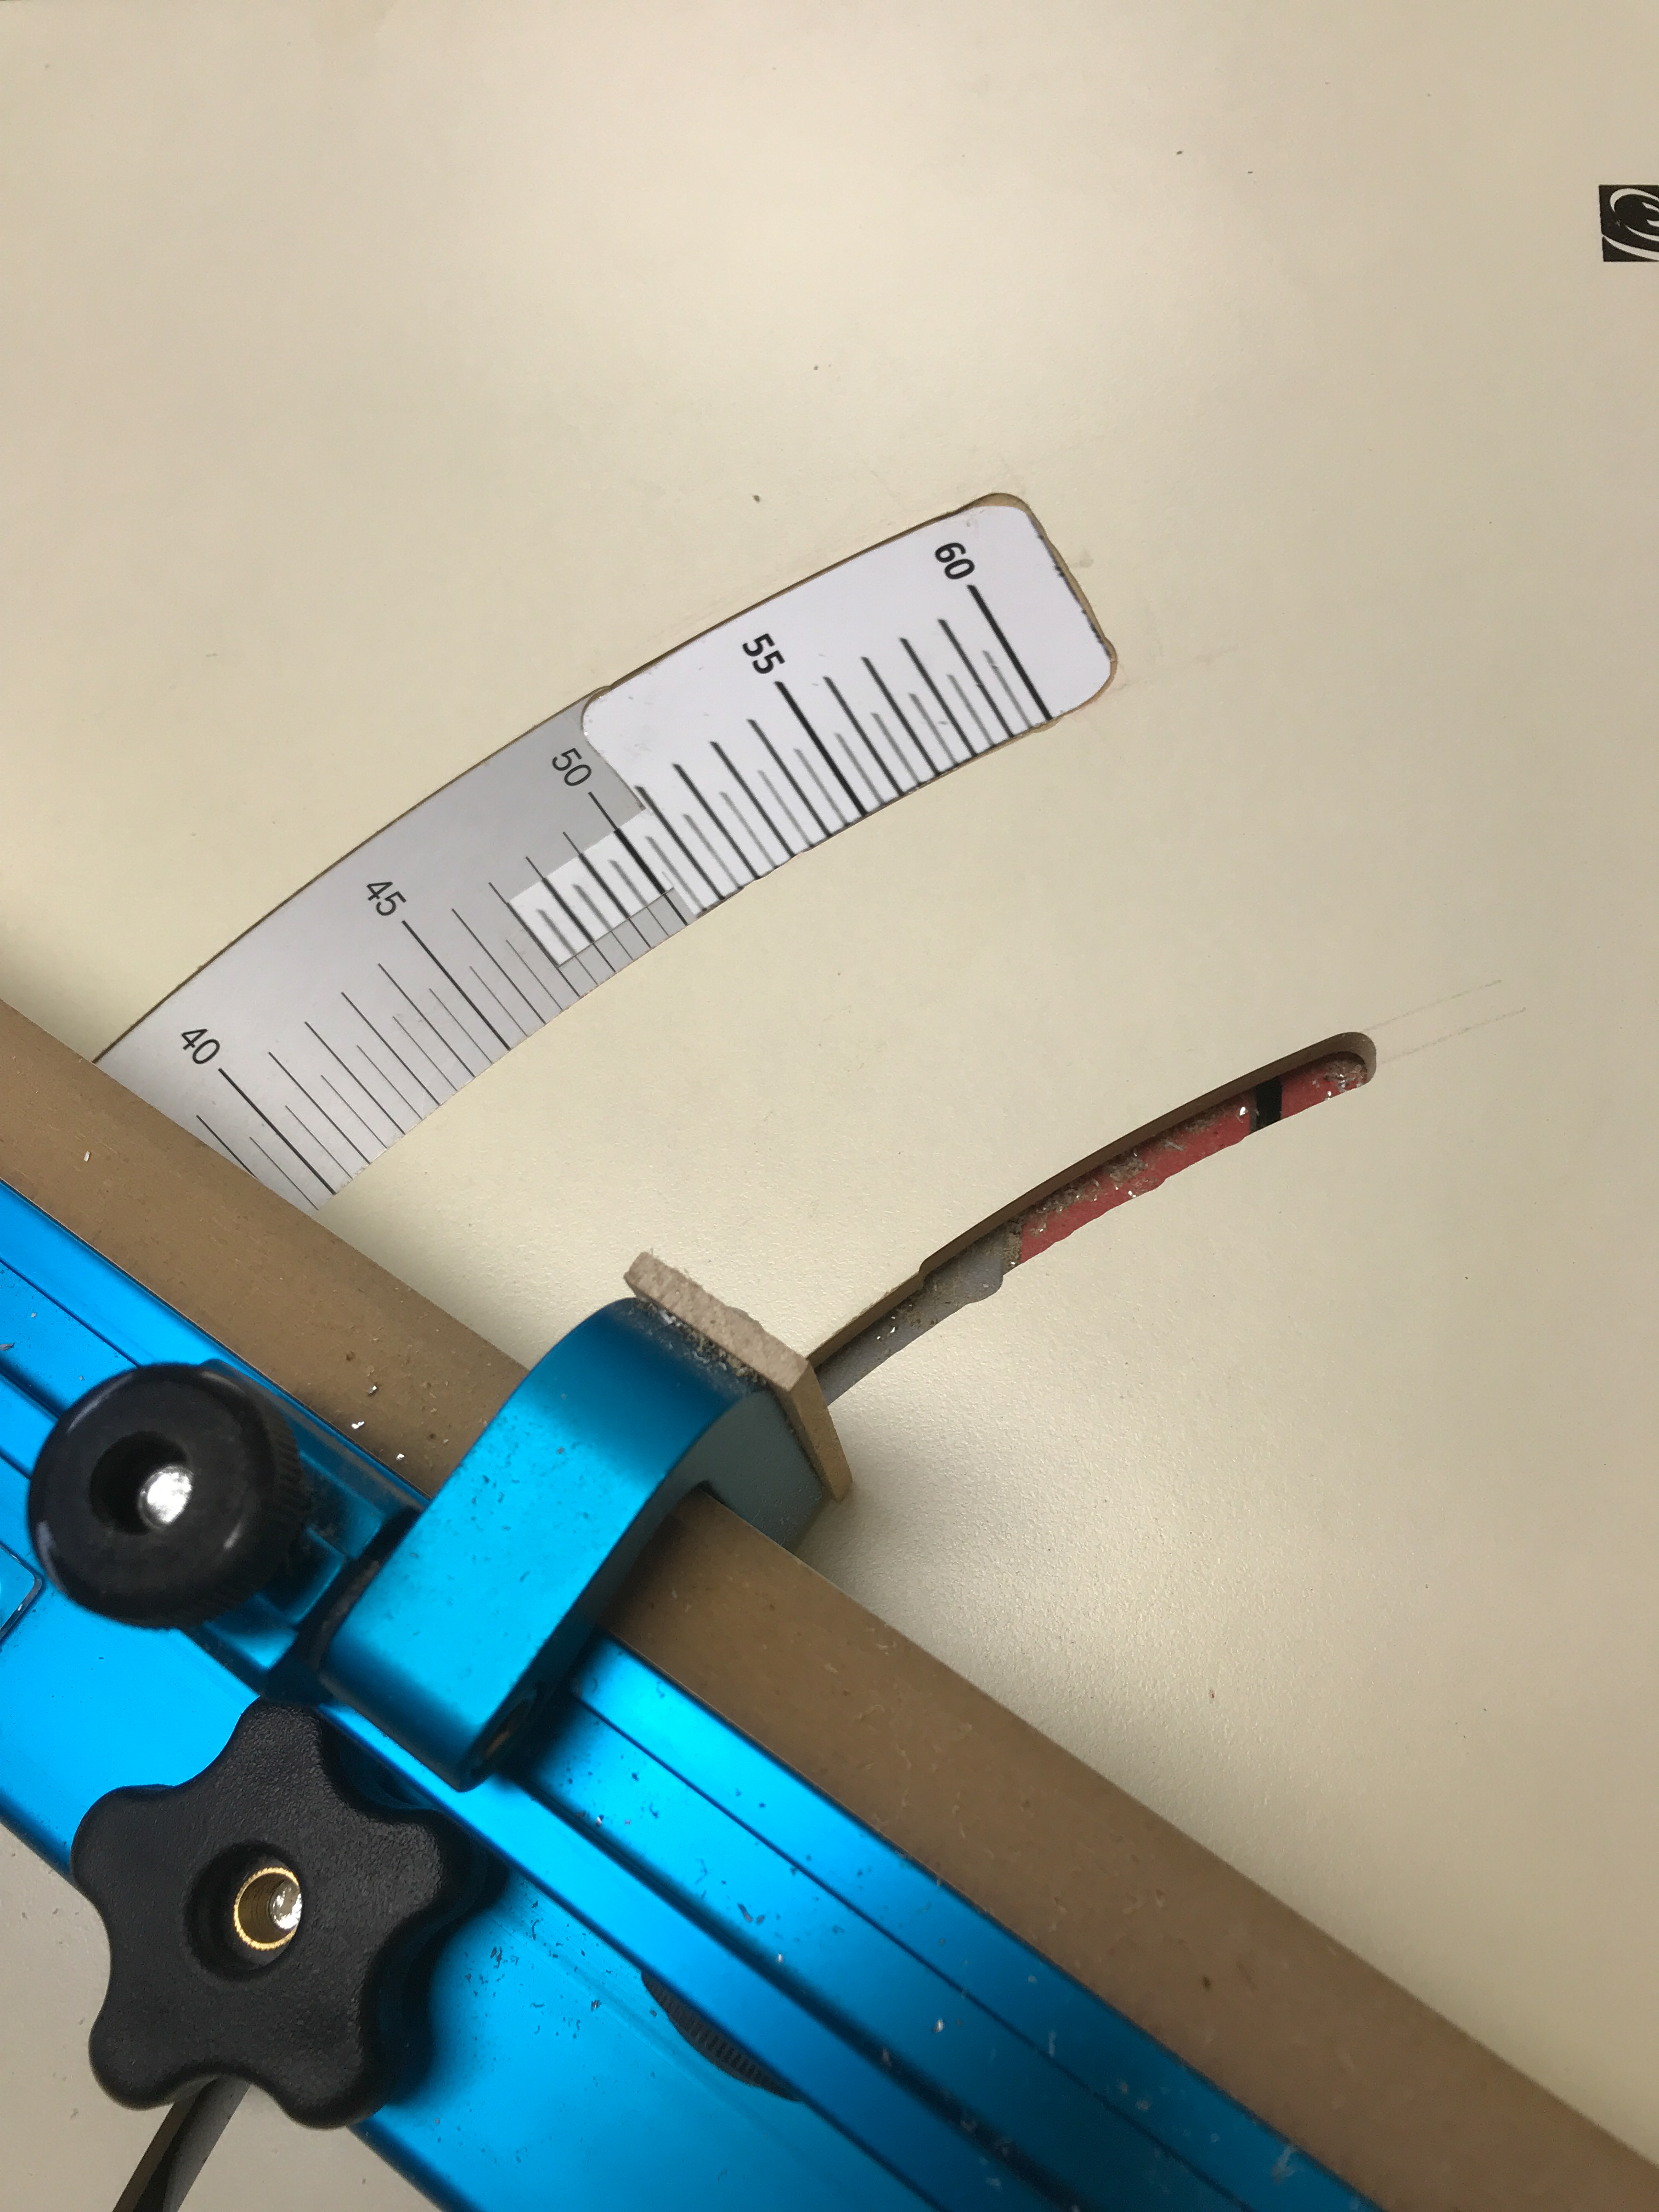
The last cut on this fat rhombus tile. The blue arm at the top of the tile is a hold-down clamp. The fence is at an angle of 18 degrees and the blue gauge on the fence track is a stop that positions the tile at the exact required distance from the blade.
I placed an order for the Marmoleum planks that I intended to cut into my Penrose rhombus tiles. It is always a bit nerve racking, making calculations, optimizing the tile sizes, trying to minimize waste, and reaching a conclusion about how much raw material will be needed. What if I am off in my estimate for the sawblade kerf?
I learned late in the ordering process that the planks were not 1-foot by 3-foot; the sales rep contacted the factory at my request and reported back that they were 300 mm by 900 mm. Further, the ordering process called for the number of square feet, but the planks were packaged in bundles, and only full bundles were shipped, so the required square foot area was rounded up to the next bundle size.
For most flooring projects, this is probably just fine, but I needed to know just how many planks would be delivered so that I could ensure that I would be able to make all of the tiles in my design. In the end I learned that the bundles contained seven planks, 20 square feet of flooring, or should I say 1.89 square meters?
With the knowledge of the exact linoleum area of each plank, I could now partition them into rhombuses (rhombi?). I determined that I could get three fat or four skinny rhombuses from each plank. I counted the rhombuses in my pattern and ordered the exact number of planks required: 21 for the skinny rhombus, and 42 for the fat ones. These are nice multiples of seven; I was pleased. I placed the order, the moment of financial commitment to this project.
Later, I realized that I could have done better. If I had slightly tilted the skinny rhombus cookie cutter on the plank, they could have been a bit larger. The fat rhombuses would have been correspondingly larger, and I would have needed fewer planks and the waste would have been smaller. I contemplated revising my plan, but after discovering that the cutting complexity would be high (introducing opportunities for mistakes), and the gain was rather small– a few percent– coupled with the guidance of my partner who reminded me about false economies, I opted to stay with my original plan. I am glad that I did.
The tile-making involved many cuts on my table saw. It was important to set up each cut with a particular jig and fixture, and then cut all of the raw material that needed that setup, all at the same time, before changing the saw for the next cut. This would guarantee that all of the pieces would be congruent, with the same dimensions and angles. It was important to make them the same, but it was even more important to make them correct. A hundred identical tiles, all of which are the wrong shape, was my greatest fear. So I embraced the expression “measure twice, cut once” and fell into a paranoid checking of dimensions and angles.
I ended up creating 84 skinny rhombus tiles and 126 fat ones. It took 462 passes through the table saw to make them. I worried about the psychological lulling of attention with repetitive tasks. I have encountered experienced woodworkers, with missing finger tips, who recounted the event that severed them. Invariably it was a lapse of attention, usually because of a trivial or repetitive cut that caused them to misjudge or ignore the spatial positions of their hands relative to the saw.
Aware of these stories, while shopping for a table saw, I learned about a model that detects human contact with the blade and fires an explosive brake to instantly stop it, analogous to an airbag in a car. They are expensive, but for an inexperienced woodworker like me, it seemed like a good investment. I am quite pleased with my SawStop table saw. It is a precision tool that I hope to never trigger.
I spent most of a week cutting tiles from the Marmoleum planks. I took it in stages, and today I cut the last of them. My fingers are intact and I am eager to start placing the tiles. I am also pleased that they seem to be dimensionally correct. My precision is not to the thousandth of an inch. I might be able to claim ½ millimeter, which would be 1/50th inch. We will see how that translates to tile placement with pentagonal symmetry!
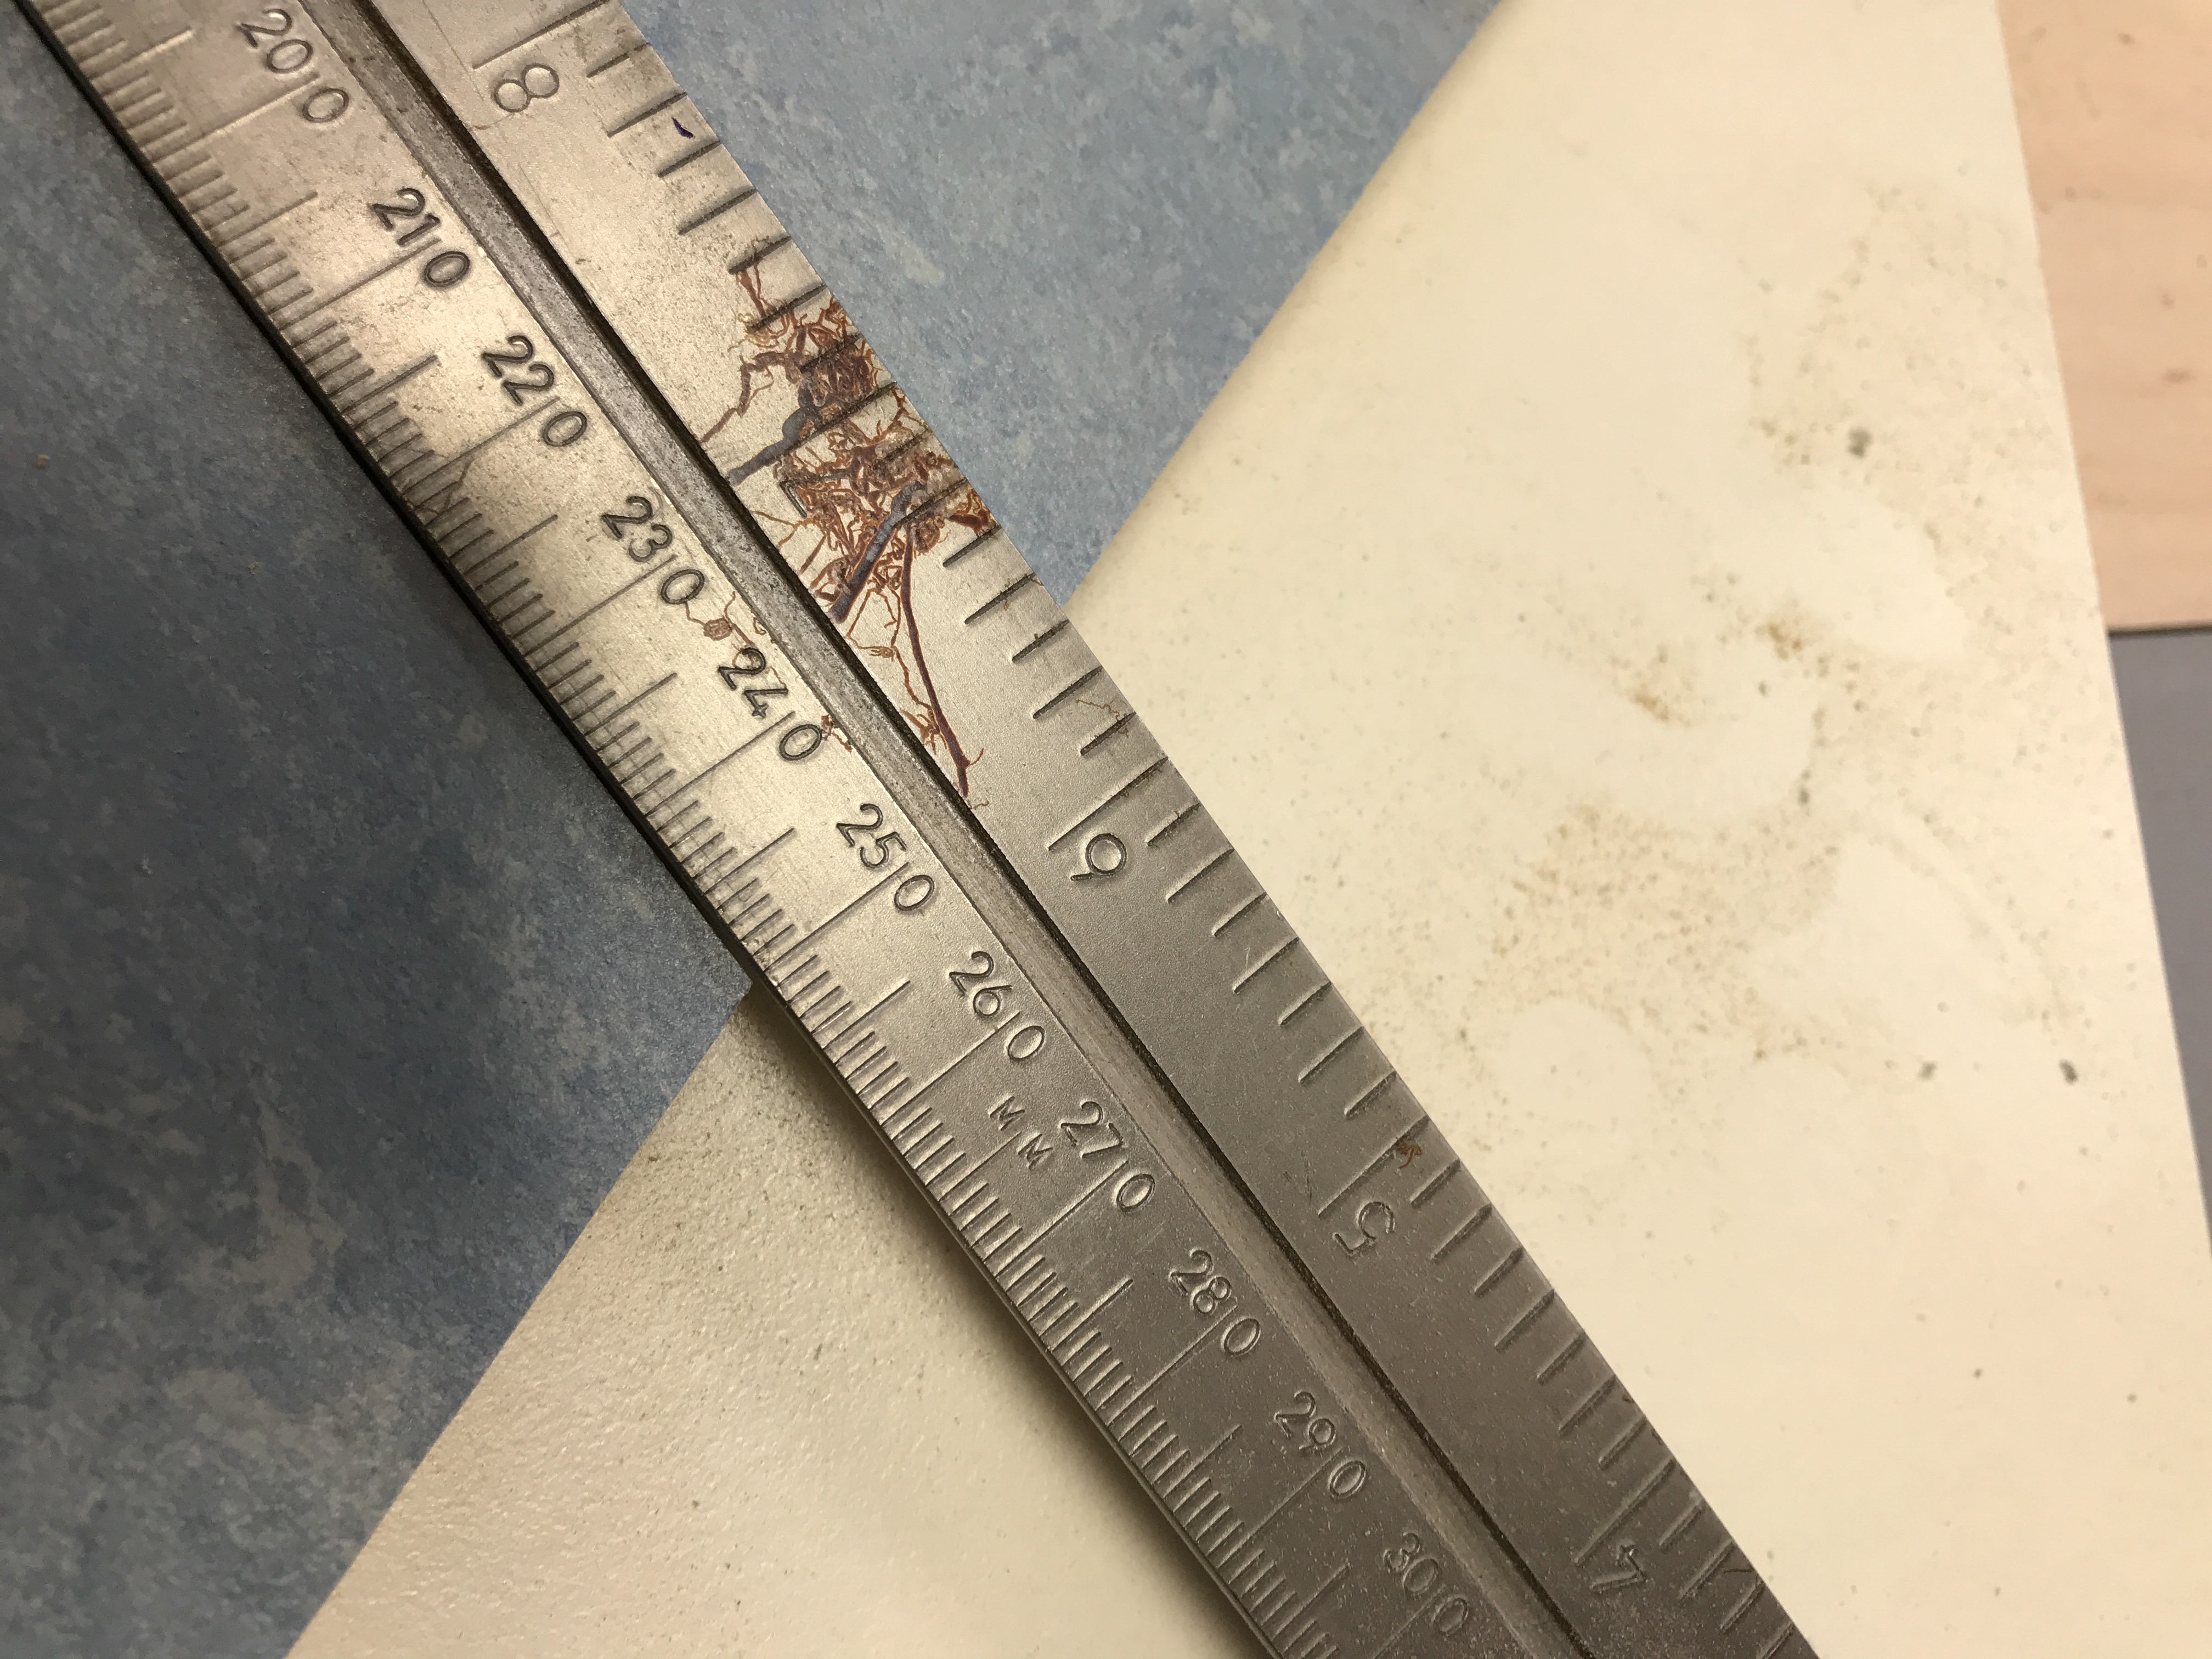
My tile size was based on an edge dimension of 250 mm, almost 10-inches. The angle of the fat rhombus is 72 degrees. Here are my checks.
The length of each side of the tile is 250 mmThis angle on the fat rhombus should be 72 degreesSkinny rhombus tiles accumulating on the workbench behind me. Hopefully they are all identical, but more importantly, matching the right size and shape.
A rectangular section of a symmetric Penrose tiling. This will be the pattern for the porch floor.
I had seen examples on the web of Penrose tiles, but they were always rather high-end installations. I recently encountered someone who had successfully created a Penrose flooring in his sunroom. I was able to ask him about the details of his project and the recurring theme in the ensuing discussion was “accuracy”. His floor was made of ceramic tiles, rhombuses carved from 1’x2’ rectangular commercial tiles with a computer-controlled water-jet cutter to one-thousandth inch precision.
I was not prepared to go to this level, so I sought less expensive materials and tooling, settling on modern linoleum, “Marmoleum”, a materal that can be obtained laminated to a medium density fiber board substrate that I could cut myself. Any lack of machine precision would be hidden by the spacing and grout lines between the tiles. At least that is my plan.
Still, it was important for the angles and dimensions of the tiles to be as consistent and accurate as possible. I made a proof-of-concept trial with sheets of plywood, cutting them on my table saw using the fence and miter gauge at the prescribed angles. This exercise showed me that the standard methods would not work. I needed a more specialized jig, one that could result in many, many congruent tile shapes being cut to precise angles and lengths. I learned that such jigs for the table saw are common, at least among the skilled woodworkers that make fine furniture and other beautiful objects.
What I needed was a “crosscut sled”, a fixture that could be crafted using the saw it would ultimately supplement, and there were many YouTube instructions on how to make one. After watching several, I opted to skip the learning curve and purchase a commercial version. It had a wonderful angle fence, riding on a machined steel guided platform running parallel to the blade, equipped with a stop that could exactly position the material for its cut.
It was perfect. I created several identical copies of the first fat rhombus, and started making the second skinny rhombus when I discovered that the jig could not reach the required angle, 54 degrees. It stopped at 50.
A customization was required and I was able to extend the range by routing a slot in the sled, and calibrating it. I now have a Penrose-compatible crosscut sled for my table saw. On to actually making my linoleum tiles!
My routing skills are not high, but I was able to extend the angular range of the crosscut sled to 60 degrees!
I am at the end of my designated time for this
expedition. I must now return from
whence I came, to a civilization density that can host a technical conference,
and will also develop the latent images captured on my film from this remote
beautiful place.
As I reflect on the past few days I realize that there are
more things that I would like to do. I
never did get to the Goulding Museum, or to the trading post near there (which
I was told by the traveler couple was closed on the weekend).
The Orion Nebula, the central star in Orion’s sword.
On this day, I manage to travel to Four Corners, a
geographic location that is only meaningful to cartographers marking the
human-made political bounds of different territories. There is certainly no physical or geographic
rartionale behind it, as the view from the constructed concrete platform
holding the National Geologic Survey brass benchmark is the same in all
directions.