


Alan Holden in his studio with shelves of his creations, ca 1970
I have long been intrigued by geometric patterns. As a teenager I made models of various polygons and polyhedra and learned the rules for constructing geodesic domes. A book that held my fascination for years was “Shapes, Space, and Symmetry” by Alan Holden.
The ability for computers to represent 3D objects and to realistically render them, to interact with them, and to display them in 3D was years in the future; in the 1970s, physical models were essential for teaching geometric principles and understanding crystal structures. The author, a physicist and chemist, had crafted a lifetime of such models and described them in his book. I could not match the patience and skill required to make his beautiful and complex cardboard models.
Also in the 1970s, Roger Penrose, the British mathematician and scientific colleague of Stephen Hawking, investigated an arcane branch of geometry to answer the question of whether an infinite plane can be tiled with a set of shapes that did not overlap, have gaps, or repeat. He found that the answer was yes, it was possible, and he discovered several sets of shapes that could do it. The first set included pentagons, stars, “boats” and diamonds. The second set was simpler, it needed only two shapes called kites and darts. The third was simpler yet, a pair of rhombuses, skinny and fat parallelograms with equal length sides. These sets of shapes, P1, P2, and P3 are known as “Penrose tiles”.
I’m not going to explain the mathematical concepts behind them, even if I could, but I will call attention to their esthetic beauty, which you can find by a simple Google search. Penrose tiles became popularized by Martin Gardner’s famous Mathematical Games column in Scientific American in 1977, and suddenly everybody was making Penrose patterns out of them. Penrose was able to patent the shapes, which were subsequently licensed for games and puzzles. He famously won a lawsuit against a company that used their non-repeating feature to prevent their embossed toilet paper from sticking on the roll!
When presented with the “canvas” of the floor in my newly renovated screen porch, I immediately wondered how best to cover it. I really liked the idea of ceramic tiles, impervious to rain and snow, and then realized this floor could be a host to the mathematical beauty of Penrose tiles!
I researched the idea. There were Penrose tilings in public spaces, famously at Texas A&M and more locally, Carleton College. I also encountered individuals who had made such patterns in their private homes. I learned that this was not a project for the wing-it, make-it-fit crowd; the tile shapes needed to be cut to thousandth-inch precision. I considered what was needed to cut ceramic tiles to this precision and decided to look at other options, the first of which was to make precision cuts of plywood panels with beautiful wood veneers. Perhaps a laser cutter could mark and cut wood tiles to the necessary precision.
A chorus of my technically and construction-astute friends warned me against this plan—the plywood edges would respond to the outdoor conditions by curling up or down in response to temperature and moisture changes.
So I went on to evaluate other materials, and re-discovered the appeal of “luxury vinyl tile”, a heavy duty version of vinyl flooring. Within this category was “marmoleum” a natural mix of linseed oil and other natural ingredients, a modern linoleum. I found that it was offered in tile plank sizes that could be trimmed into Penrose tile shapes!
I now had a medium, but needed a pattern. Penrose tiling is not quite as simple as laying the tiles down wherever they fit. In order to tile the plane, with no overlaps and no gaps, one must follow the “edge matching rules”. By matching the edges, the tiling that results will ensure that the plane will be perfectly covered. To help accomplish this, tiles are marked in such a way that adjacent tiles will be placed according to the edge matching rules.
I wanted to make a scale mock-up of the floor pattern. I tried some of the online Penrose tile patterns, printed them out, and cut multiple copies. The paper-thin substrate, scissors-cut by hand, were not very successful. They didn’t lay flat or align well and were easily disturbed by any slight breeze or sneeze.
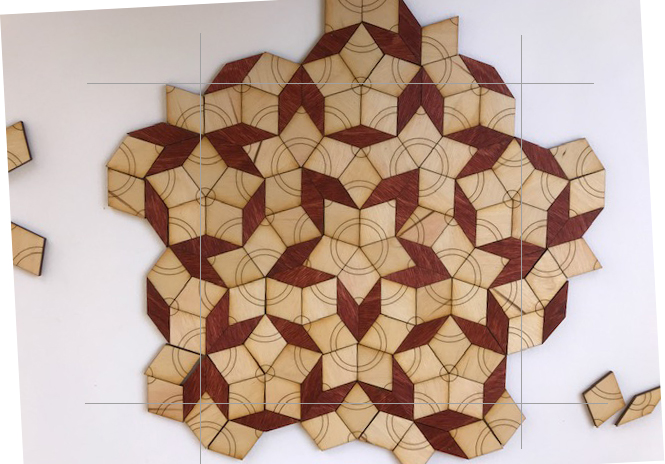
I discovered an alternative. An Etsy store of homemade wooden toys that included among their catalog of rocking horses and train cars, a set of laser-engraved, wooden Penrose tiles, beautifully crafted, sanded and finished, in either P2 or P3 shapes, all in a handy home-sewn carrying bag! I ordered one set each from Wooden Giraffe Toys and had them within a few days! I immediately started making aperiodic five-fold symmetric tilings from them to get a feel of what the floor might look like.
The front of the tiles had the edge-matching rule markings, but the backsides were a solid contrasting color. Once the pattern was confirmed by the front markings, individual tiles could be flipped to create the visual pattern I sought.
Now that I have a Penrose tile pattern to my liking, I need to figure out how to actually make the tiles and install them.
I don’t consider them toys; they are tools!

OMG, Thor. I can’t believe you are making this.
LikeLike